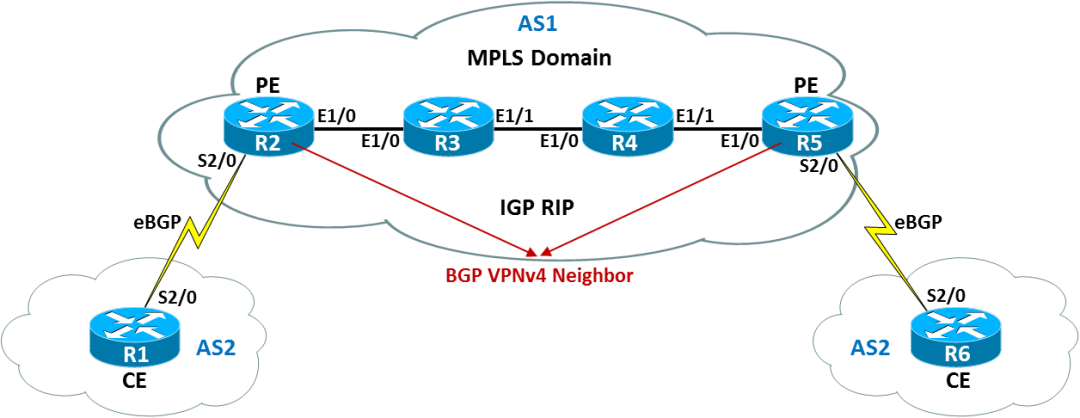
在PE和CE之间配置BGP

每台设备都有一个Lo0,地址分别为X.X.X.X/32(X为设备编号);
设备间互联链路网段采用两台设备的编号,例如R1与R2互联链路网段为12.1.1.0/24,以此类推;
R2、R3、R4、R5运行RIPv2,关闭自动汇总,宣告环回口和直连,但是R2不宣告12.1.1.0/24网段,R5不宣告56.1.1.0/24网段;
R1与R2建立eBGP邻居关系并且宣告Loopback0接口;
R6与R5建立eBGP邻居关系并且宣告Loopback0接口;
R2和R5启用MP-BGP,使用Lo0建立VPNv4邻居传递客户路由,R2把路由1.1.1.1/32传给R5,R5把路由6.6.6.6/32传给R2,使得两个CE之间能够互访;
R2和R5之间是MPLS域,要求启用MPLS;
Cisco IOS Version 15.2。
IP地址和IGP配置:
配置R1:
interface Loopback0
ip address 1.1.1.1 255.255.255.255
!
interface Serial2/0
ip address 12.1.1.1 255.255.255.0
no shutdown
!
配置R2:
interface Loopback0
ip address 2.2.2.2 255.255.255.255
!
interface Serial2/0
ip address 12.1.1.2 255.255.255.0
no shutdown
!
interface Ethernet1/0
ip address 23.1.1.2 255.255.255.0
no shutdown
!
router rip
version 2
network 2.0.0.0
network 23.0.0.0
no auto-summary
配置R3:
interface Loopback0
ip address 3.3.3.3 255.255.255.255
!
interface Ethernet1/0
ip address 23.1.1.3 255.255.255.0
no shutdown
!
interface Ethernet1/1
ip address 34.1.1.3 255.255.255.0
no shutdown
!
router rip
version 2
network 3.0.0.0
network 23.0.0.0
network 34.0.0.0
no auto-summary
配置R4:
interface Loopback0
ip address 4.4.4.4 255.255.255.255
!
interface Ethernet1/0
ip address 34.1.1.4 255.255.255.0
no shutdown
!
interface Ethernet1/1
ip address 45.1.1.4 255.255.255.0
no shutdown
!
router rip
version 2
network 4.0.0.0
network 34.0.0.0
network 45.0.0.0
no auto-summary
配置R5:
interface Loopback0
ip address 5.5.5.5 255.255.255.255
!
interface Serial2/0
ip address 56.1.1.5 255.255.255.0
no shutdown
!
interface Ethernet1/0
ip address 45.1.1.5 255.255.255.0
no shutdown
!
router rip
version 2
network 5.0.0.0
network 45.0.0.0
no auto-summary
配置R6:
interface Loopback0
ip address 6.6.6.6 255.255.255.255
!
interface Serial2/0
ip address 56.1.1.6 255.255.255.0
no shutdown
配置R1:
router bgp 2
no auto-summary
no synchronization
bgp router-id 1.1.1.1
neighbor 12.1.1.2 remote-as 1
network 1.1.1.1 mask 255.255.255.255
配置R2:
ip vrf xmws //建立虚拟的转发路由器,隔离客户的路由
rd 2:2 //设置RD值,用于区分不同客户的路由
route-target export 100:100 //设置RT值,使得VPN路由能够被PE接收
route-target import 100:100
!
interface s2/0
ip vrf forwarding xmws //把S2/0接口划入虚拟路由器xmws
ip address 12.1.1.2 255.255.255.0
!
router bgp 1 //启用MP-BGP传递客户路由
no auto-summary
no synchronization
bgp router-id 2.2.2.2
neighbor 5.5.5.5 remote-as 1
neighbor 5.5.5.5 up lo0 //VPNv4模块将来会借用全局的路由建邻居
address-family ipv4 vrf xmws //启用BGP VRF模块,用来收集VRF的路由
neighbor 12.1.1.1 remote-as 2 //PE跟CE运行BGP直接在vrf模块下neighbor
neighbor 12.1.1.1 as-override //用自己的as-path覆盖相同的as-path
address-family vpnv4 //启用BGP VPNv4模块,用来收集所有VRF的路由
neighbor 5.5.5.5 activate //借用全局的邻居(激活VPNv4邻居)
配置R5:
ip vrf wisdom
rd 5:5
route-target export 100:100
route-target import 100:100
!
interface Serial2/0
ip vrf forwarding wisdom
ip address 56.1.1.5 255.255.255.0
!
router bgp 1
no auto-summary
no synchronization
bgp router-id 5.5.5.5
neighbor 2.2.2.2 remote-as 1
neighbor 2.2.2.2 up lo0
address-family ipv4 vrf wisdom
neighbor 56.1.1.6 remote-as 2
address-family vpnv4
neighbor 2.2.2.2 activate
配置R6:
router bgp 2
no auto-summary
no synchronization
bgp router-id 6.6.6.6
neighbor 56.1.1.5 remote-as 1
network 6.6.6.6 mask 255.255.255.255
neighbor 56.1.1.5 allowas-in 1 //允许收到路由的as-path中如果有相同的as,允许as号跟我重复几次
配置R2:
mpls ldp router-id Loopback0
mpls label range 200 299
!
interface Ethernet1/0
mpls ip
配置R3:
mpls ldp router-id Loopback0
mpls label range 300 399
!
interface Ethernet1/0
mpls ip
!
interface Ethernet1/1
mpls ip
配置R4:
mpls ldp router-id Loopback0
mpls label range 499
!
interface Ethernet1/0
mpls ip
!
interface Ethernet1/1
mpls ip
配置R5:
mpls ldp router-id Loopback0
mpls label range 500 599
!
interface Ethernet1/0
mpls ip
测试:

来源:微思网络
TikTok千粉账号购买:https://www.tiktokfensi.com/

TOP